Saturday, November 26, 2016

Blog Hop November 2016 - Easy Christmas Card


Hello fellow stampers and happy Saturday!
Welcome to the Seashore Stampers November 2016 Blog Hop!
This time round we are creating easy Christmas cards so that those of us that might be madly dashing around while planning the best holiday season yet, can still create a handmade card and send it out.

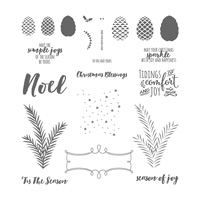
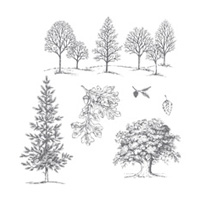
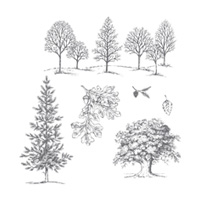
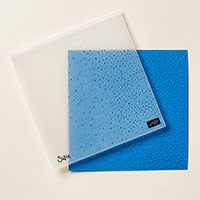
The card I am sharing with you today is using the beautiful and versatile Lovey as a Tree stamp set from Stampin' Up, and the greetings from the Christmas Magic stamp set.  This card really was very easy and fun to make and I have the directions for you below. 


What other color combinations can you think up and want to try?


Close up and also showing my stamped envelop
The inside of card and the envelope again.


Have a wonderful weekend and see you again soon! 

Now, on to Erica's blog or back to Adrienne's Blog.

To Adrienne's Blog
To Erica's Blog


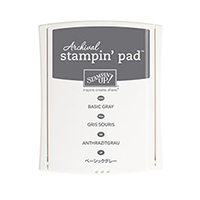
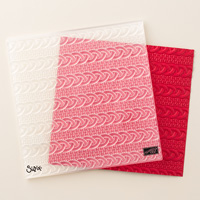
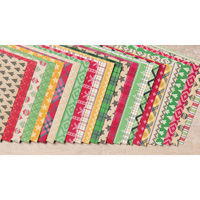
Stampin' Up Supplies Used:


Tips on recreating this card:

Cutting:
Card base:  Whisper White Thick cut 11" x 4 1/4" and then scored in half
1st Mat:  Mint Macaron cut 5 3/8" x 4 1/8"
2nd Mat:  Garden Gree cut 4 5/8" x 3 3/8"
Stamping piece:  Whisper White Thick cut 4 1/2" x 3 1/4"
Okay, now you:
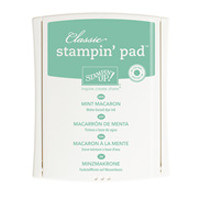
1. Emboss your 1st Mat  (Mint Macaron) with the Softly Falling Embossing Folder.
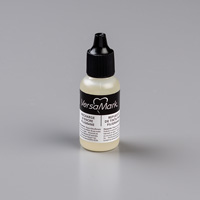
2.  Rub the stamping piece with your embossing buddy and then ink up the stand of trees with Versa Mark and stamp onto your cardstock.
3.  Coat your stamped image with White embossing powder, gently tap off excess embossing powder, and heat set with your heat tool.
4.  Sponge over your embossed trees with Mint Macaron Ink and a sponge (Each time I inked up my sponge I started sponging within my trees and worked outwards - take your time and enjoy the process of the embossed trees being revealed. Neat, huh?!).
5.  Stamp your greeting using Garden Green Ink. (I also stamped the inside greeting of my card with Garden Green Ink).
6.  Stamp the small pine bough with pine cone on either side of your greetings using Mint Macaron Ink.
7.  Now assemble your card:
  • Glue your stamped piece to the Garden Green cardstock mat
  • Next, glue the embossed Mint Macaron cardstock mat to your card base
  • Last, glue your matted stamped piece to your card centering or place where you want!
8.  Also, please sign the back of your card and stamp/decorate your envelope as you wish!
I say pretty good Santa's elf/helper! Have fun in Santa's Workshop!


Monday, November 21, 2016

Miss Owly Sparkle Christmas Card

Hello stamping friends.  How are you today? 
Go ahead and get a cup of tea and enjoy my post.

I had such a fun time creating this christmas card that I had to give the little owl a name, "Miss Owly".  Isn't she cute?  The card itself is the easy Z-fold card and I used the layering Ovals dies to create my decorative piece (I think the Stitched Ovals from Stampin' Ups Stitched Layers would look lovely as well).


Close-up of "Miss Owly" - I forgot to mention I used Wink of Stella around her eyes - you can't see it
in the photo but it looks very lovely in real life!


Closeup of card opended so you can see the details of where I stamped on the inside panel of card.
Picture of the main cardstock pieces cut and folded and embossed.
This shows the oval dies cut images as well as the stamped images
 I hope this card gives you inspiration to create one of your own.
Thank you so much for stopping by and enjoy the rest of your week!

Happy Inky Smiles


Stampin' Up! Supplies I Used:

Tips so you can recreate this card:
Cut:
Cardbase is Basic Gray and cut 11" x 4 1/4"
Inside card: Whisper White and cut 5 3/8" x 4 1/8"
Embossed card front:  Pool Party cut 4 1/8" x 2 3/8"
Scraps of Basic Gray (large oval die cut); Pool Party (slightly smaller scalloped oval); Whisper White (slightly smaller oval that has stamped branch); and Smoky Slate (for Miss Owly).
Stamp:
1. Use Basic Gray to stamp the branch from Cozy Critters onto Whisper White.  Place the oval die over the stamped branch where you like it and then die cut the oval out.
2.  Apply Clear Dazzling Details (or glue and Dazzling Diamonds Glitter) over the stamped branch and set aside to dry.
3.  Die cut the scalloped oval in Pool Party and the largest oval in Basic Gray.
4.  Emboss the Pool Party rectangle using the Cable Knit embossing folder (remember to spray the cardstock with water first so you get a deeper impression).
5.  Stamp "Miss Owly" onto Smoky Slate cardstock and punch out using the Owl Builder Punch.
6.  Stamp "Miss Owly" again onto Whisper White scrap with Basic Gray and color in the beak with the Pumpkin Pie marker and the scarf bands in Rose Red.
7.  Cut out the eyes and the scarf and glue to your punched out owl.
8.  Stamp the "snowflakes from the Christmas Pines set onto the inside portion of the card using Pool Party leaving the middle portion clear.
9.  Stamp greeting onto center of the inside card in Basic Gray (I used one of the greetings from the Christmas Pines set) or wait until you have glued on your oval stack before stamping your greeting so the greeting stays hidden behind the oval when card is closed.
10.  Now you get assemble your card:

  • Glue the embossed cable knit Pool Party piece to the folded card front
  • Glue your inside piece to the inside of the Basic Gray cardbase
  • Glue your white stamped oval to the Pool Party Scalloped oval and then glue to the Basic Gray oval

11.  Now dry fit your assembed oval onto your card and gently mark the top and bottom of the oval where it meets the spine of the folded z-fold of the card base.  Apply glue only to the portion of the oval that will be attached to the folded/embossed portion of the card (otherwise you will a nice card that is glued shut!
12.  Now attach "Miss Owly" to the branch with Stampin' Dimensionals.
13.  Last, apply a Rose Red enamble heart to the scarf of "Miss Owly" and two gold (or silver) metallic stars to the greeting.
Whoo-hoo! You are done and can enjoy your card creation!

Monday, November 14, 2016

Reindeer Treat Box

Happy Monday everyone!

Today I created a treat box using the lovely reindeer from the Cookie Cutter Christmas stamp set.  The box itself really came together quite easily and I only needed one sheet of 11" x 7" cardstock!  This project lends itself very well for a table setting for Christmas, and also for the upcoming US Thanksgiving.

I used two delicate doilies cut into quarters and then, once attached to the back
of the DSP piece, trimmed any exposed doiley pieces.

I used retired  Dazzling Details in Cherry Cobbler for the nose,
a cherry cobbler enamble heart, and basic pearls to dress up
my reindeer tag!

Thank you for stopping by and have a wonderful week!


Stampin' Up! Products I used:
Tips to recreate this treat box:
  1. Cut cardstock base (I used Crushed Curry) to 11" x 7" and  score along the 11" side at: 2 1/2", 5", 7 1/2" and 10".  On the 7" side, score at:  2 1/2" and 5" (you will have a shorter section for the top flapdown.
  2.  Cut your Designer Series Paper as follows:
    • 4 pieces at 2" square
    • 5 pieces at 2" x 1 1/4"   
3.  Cut your two doilies into 4 sections (or quarters).
4.  Cut a piece of Crumb Cake cardstock 4 1/4" x 2" and punch one short end using the Scalloped Tag Topper Punch.
5. Assemble Box (It would take me too long to explain in words here, so please google boxes online and see what others have done to assemble their boxes - this is a very popular box.  I hope to take a picture of a scored and cut sample piece of the cardstock box before assembly and will post it here when I do).
6.  Attach/glue the doily sections to the backs of your DSP sections (four for the box sides, and four for the flaps attached with the Kraft Rope).
7. Punch holes on each side of the box flaps  1 1/4" down from the fold of the box top.
8. Run your Kraft Rope through each set of adjoining holes and tie a knot (I kept my rope on the role as I went down the first hole from the front of one side and then up the adjoining hold on the next flap.  Then i tied the knot and cut the rope away from the role.  This way there is no wastage and you have something to hang onto when you tie the knot.  I ended up using about 4" per tied section.)
9. Stamp your Reindeer with Early Expresso Ink onto Very Vanilla cardstock (you can also use watercolor paper or Shimmery White - I am presently out of both and need to order more.  The watercolor paper and the Shimmery White cardstock allow you to blend the ink with your blender pen more easily).
10.  Using Crumb Cake ink and your blender pen, color in your happy reindeer! Now punch him/her out using the Cookie Cutter punch (reminder: stamp your reindeer upside down from the edge of the cardstock so you can easily punch him/her out - or you can trim cardstock to get punch into stamped shape correctly :)).
11. Stamp saying of your choice onto the bottom of the tag first (I used Early Expresso ink). 
12. Then apply the strip of Designer Series Paper just above.
13. Attach your Reindeer using Stampin' Dimensionals (I used 2).
14.  Attach one enamel heart from the Regals set.
15.  Attach some basic pearls too.
16.  Color in your reindeer nose if you wish (I used retired Cherry Cobbler Dazzling Details).
17.  I applied a tiny dot of White Stampin' Chalk Marker to each of the Reindeer's black eyes.
18. Last, run 12" of Kraft Rope through the hole at the top of the tag and secure to your goodie bag.
Now, enjoy your efforts and see who you would like to give your creation to!