Saturday, December 31, 2016

Blog Hop December 2016 - Happy New Year Card


Hello stampers and welcome to the Seashore Stampers' December 2016 Blog Hop.  Please, sit back and enjoy your hop (I personally suggest a lovely cuppa of your choice, and maybe a snack, to keep you energized).  

I have a New Year's card to share - I used bright colors for my focal image and stamped the greeting in Basic Black.  The edges were also sponged using the same ink colors as used in the matting - and yes, there is quite a bit of matting here: five layers to be exact! The stamped focal point and the card base are layers 5 and 6, if you want count all the layers!  I hope you like it.


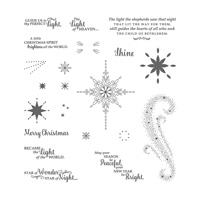
Doesn't the stardust spray remind you of fireworks?


Close-up so you can see the inked colors in the stardust spray


Inside of card - you can see the sponging along the edges!


You can see a bit of the sponging along the bottom edge here as well as the details of where
I placed the rhinestones and where I placed the glitter.

Now onto the next blog on this hop, or back to the previous blog on this hop (are you tired yet? :)):


Adrienne's Blog

Erica's Blog


Happy Inky Smiles and Cheers to a very Happy New Year!


Stampin' Up! Products used:


Tips to help you recreate this card:
Cut:
Card base is Bermuda Bay:  8 1/2" x 5 1/2"
Mat layer #1 in Basic Black: 5 3/8" x 4 1/8"
Mat layer #2 in Pumpkin Pie:  5 1/4" x 4"
Mat layer #3 in Crushed Curry:  5 1/8" x 3 7/8"
Mat layer #4 in Melon Mambo:  5" x 3 3/4"
Mat layer #5 in Basic Black:  4 7/8" x 3 5/8"
Stamped focal piece in Whisper White:  4 3/4" x 3 1/2"
For inside of card:  Whisper White 5" x 3 3/4"
Next:
1.  Ink up the greeting with Basic Black ink and stamp at the bottom right hand corner.
2.  Ink up the sparkly spray using sponge daubers as follows:  bottom part of spray is Bermuda Bay; top portion of spray is Crushed Curry; the spray portions in between I sponged with Pumpkin Pie and Melon Mambo - but please feel free to try your own combinantion (even change up the colors if you want!)
3.  Without reinking the spray - stamp it onto the Whisper White card piece for the inside of your card.
3.  Using sponges I then went around the edges of the Whisper White stamped card pieces (including the piece for the inside) inking up sections using the same ink colors:  Bermuda Bay, Melon Mambo, Pumpkin Pie and Crushed Curry.
4. I then used my snail to attach each incrimental mat piece to the stamped art piece - the last being the whole matted piece to the Bermuda Bay cardstock!
5.  You might want to consider using extra matting pieces too for the inside of the card - I didn't this time round, but I want to try it again with one or two cardstock colored mats.
6.  I applied Basic Rhinestones to the stamped card piece and then I used my retired 2-way glue pen to apply glue to random areas on the inked spray and then applied my Dazzling Diamonds glitter as a finishing touch!  You can use the Fine Tip Glue bottle as well for this!
Enjoy your card and I hope it brings a smile to your heart.

Monday, December 26, 2016

Year-end Thank You

Hello stamping friends!
I hope you had a delightful Christmas and are now easing your way to a Happy New Year.
I wanted to share a thank you card I made for one of my friends who helped out this past week.


Easy and so Cute!


Close-up

Until next time, please have an enjoyable holiday week filled with happiness!


Stampin' Up! Products used for this card:

I used the Stampin' Up! notecards with matching envelopes in Crumb Cake: the card measures 5" x 3 1/2"
One package produces 20 cards!!!!  
Cut two pieces of Very Vanilla 4 3/4" x 3 1/4" (one for the outside and one for the inside.
Scrap of Very Vanilla for the "reindeer"
Next:
1.  Take washi tape and apply to bottom of Very Vanilla card piece.
2.  Stamp "thank you" just above washi tape with Early Expresso ink.
3.  Now emboss the section just above the stamped greeting.
4.  Stamp Reindeer image with Early Expresso ink.
5.  Use blender pen and Chocolate Chip ink to color in your reindeer.
6.  Punch out reindeer with matching punch.
7.  Apply reindeer to card to the washi taped/embossed/stamped piece with stampin' dimensionals.
8.  Apply remaining Very Vanilla cardstock to inside of card.
9.  Sign the back of your thank you card and give to recipient!

Monday, December 19, 2016

It's The Most Wonderful Time of the Year Card - Alternate color combinations

Hello stampers and Happy Monday!

Today I want to share with you the alternate color combinations I used to recreate the card from my last week's post.  This time round I used Sweet Sugarplum as the main color and used this color alone in one card; then with Mint Macaron in another card; and my last card I used Cucumber Crush as my second ink color.  I also added the Basic Pearls to two of the cards and added sponging (again different variations) to all three cards.  Take a look at the pictures to see what I mean (it's a lot of info to absorb and can be confusing without seeing it):


All three cards with inking variations


Here I only used Sweet Sugarplum Ink and I
only sponged the edges of the card mat


For my second card I added Mint Macaron to the mix.
I sponged the greeting with Mint Macaron making it pop
and I sponged the mat edging with Sweet Sugarplum
For my third card I used Cucumber Crush Ink and sponged the greeting and
the matting edges withSweet Sugarplum ink


See? Once you get going the variations are endless! I hope you like these variations and give at least one of these cards a try - they are all really easy to recreate.  Have some fun!


Stampin'Up Supplies Used:


Tips to recreate these cards:
Cut:
Cardbase in either Sweet Sugarplum, Mint Macaron or Cucumber Crush: 8 1/2" x 5 1/2" and folded in half to create card base :)
Mat pieces in Whisper White (for whichever card you decide to make): 5 1/4" x 4" and 4 1/8" x 2 5/8"
Stamp piece in Wisper White (again for whichever card you decide to make): 4" x 2 1/2"
Now:
1.  Use embossing buddy to rub over stamp piece.  
2.  Ink up saying by first using VersaMark Ink and then using ink color of your choice (either Sweet Sugarplum, Mint Macaron or Cucumber Crush) and then stamp onto center of your stamp piece (use your Stamp-a-ma-jig if necessary).  Dip stamped greeting into clear embossing powder and heat set.
3.  Take your stamp piece and temporarily stick to the center of the large background mat.
4.  Using ink color of choice (either Sweet Sugarplum or Cucumber Crush), stamp the snowflakes randomly around the stamp piece and the background matting. (***For the Cucumber Crush snowflakes, I first lightly stamped the inked snowflake onto scrap paper and then onto my card piece - this gave me a lighter shade of the Cucumber Crush.  You don't have to do this if you don't want to, but it is what I did).
5.  Remove the stamp piece from the large background that now has partial stamped images of snowflakes.
6.  Next, before attaching your small mat piece to the stamp piece decide if you wish to also sponge the edges.  If you do, do it now and then attach your stamp piece to your mat piece.
7.  If you also decide to sponge over your greeting, once you are done, take a piece of tissue and rub over the embossed greeting so you remove any remaining ink.  This makes the greeting "pop".
8.  I attached my matted stamp piece to the stamped white matting piece with multipurpose glue but you can also attach using Stampin' Dimensionals which will make the stamped piece stand out a bit more.
9.  Now you attach the whole matted "sandwich" to your cardbase.
10.  Decide if you would like to add either Basic Pearls or Basic Rhinestones (or not) to your card (see picutres for placement ideas.
11.  Because we used a colored cardstock for the cardbase, I put a piece of Whisper White cardstock (cut 5 1/4" x 4" to the inside of my card. I stamped another greeting of my choice in matching cardstock ink.
12.  Don't forget to sign the back of your card creation - we all like to know who made the card we receive :)
13.  Also remember to stamp your envelope. :)
That's it!  Now pat yourself on the back for being such a great card elf and send to someone you love.