
So glad you stopped by for today's card share.
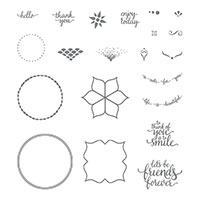
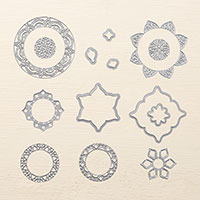
I really enjoyed the card I made last week using Stampin' Up!'s Eastern Beauty stamp set and the Eastern Medallion Die set, so I decided to create another one using a different color scheme. I love red and black and wanted to add some gold, so I added Daffodil Delight.
 |
| Card front |
 |
| Close-up of top portion of card front |
 |
| Bottom portion of card front |
 |
| Inside of Card |
Happy Inky Smiles for now.
 |
Stampin' Up! Supplies Used:


Tips and Trick to Recreate this Card:
Cut:
Cardbase in Daffodil Delight: 11" x 4 1/4"
Basic Black cardstock mat (x 2): 5 1/4" x 4"
Real Red cardstock mat: 5 1/8" x 3 7/8"
Very Vanilla cardstock for inside: 5 1/8" x 3 7/8"
Scraps of Daffodil Delight cardstock for: 2" punched cirle; 1 1/4" punched circle and 2" die cut flower
Next:
1. Fold your Daffodil Delight card base in half and set aside.
2. Take three dies from the Eastern Medallion die set and place onto the Real Red cardstock mat in a pleasing arrangement to you (see photo for placement ideas).
3. Run your cardstock mat with the placed dies through your Big Shot machine.
4. Die cut the six petal flower from Daffodil Delight cardstock.
5. Ink up the small decorative stamp (as shown in photo) with Basic Black Archival Ink and stamp onto each flower petal on the yellow flower and onto the red cardstock mat between each of the red petals (also stamp at the top and bottom corners of the red cardstock mat - see photo).
6. Ink up the 2" decorative circle stamp with Basic Black Archival Ink and stamp onto scrap of Daffodil Delight cardstock. Punch out with 2" circle punch.
7. Glue the stamped yellow circle onto the red die cut flower and then glue your die cut and inked yellow flower onto the center of the yellow circle.
8. Ink up one of the shaped greetings with the Basic Black Archival ink and stamp along the bottom right corner of the red flower.
9. Ink up the largest double lined circle with Basic Black Archival Ink and stamp onto the red cardstock mat around the die cut medallion (see photo).
10. Punch out one 1 1/4" circle from the Daffodil Delight cardstock and glue to the backside of the decorative circle die cut medallion in the upper left corner of the red cardstock mat.
11. Glue your Real Read die cut mat to your Basic Black cardstock mat, and then glue this to your Daffodil Delight card base.
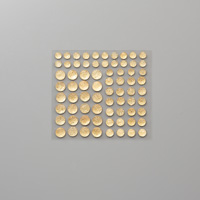
12. Attach the Gold Faceted Gems to your card front as shown.
13. Stamp the Very Vanilla inside mat as desired (see photo for ideas) and then glue onto the Basic Black cardstock mat. Now glue this to the inside of your card.
14. Sign the back of your card.
15. Stamp/decorate your envelope too.
You are now done! Enjoy your stamped creation and then send it out to someone special in your life!
No comments:
Post a Comment