

Happy Saturday everyone and welcome to the Seashore Stamper's Blog Hop!
This month the theme is "something frameable". I thought I would repurpose my desktop plastic calendar case and create another background for a new mini 2017 calendar. I really enjoyed making it and it did not take long. I hope this inspires you to create something yourself!
 |
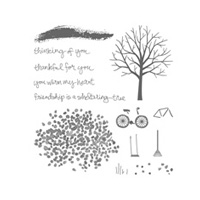
| Stamped background for a mini calendar |
 |
| Closeup of stamped and embellished background |
Now please hop on forward to Erica's blog to see what she has wonderfully created!
 |
| Adrienne's Blog |
 |
| Erica's Blog |
Until next time,

Stampin' Up Products Used:


Cut:
Base for calendar: Crumb Cake Cardstock 5 1/2" x 4 5/8"
Mat: Real Red 5 1/4" x 4 3/8"
Stamping piece: Shimmery White cardstock 5 1/8" x 4 1/4"
Next:
1. Take one of your acrylic stamp blocks and randomly ink up the block using Cucumber Crush, Crushed Curry and Real Red inks. Then spray the inked block with water and "stamp" onto your shimmery white cardstock.
2. Ink up words from the Love Sparkles stamp set in Early Expresso and stamp onto background (see photos for ideas).
3. Stamp tree from Sheltering Tree stamp set with Early Expresso ink.
4. Stamp leaves from Sheltering Tree stamp set with Cucumber Crush ink.
5. Color in the word "celebrate" with Crushed Curry marker.
6. Write "today" in your own handwritting using Early Expresso marker.
7. Using the Fine Tip Glue pen apply metallic shapes randomly to the stamped background.
8. Apply Dazzling Details glue in gold over the metallic shapes and over the sparkle sprays on the words.
9. Apply Rhinestone Basic Jewels where you wish.
10. Attach the mini calendar.
11. Once your stamped artwork is try, place into your repurposed plastic calendar case (I believe a plastic CD case would work too - just measure the plastic case you plan on using to cut your cardstock to the correct size).
Thank you Bruni for sharing your very creative project! A great idea.
ReplyDeleteI love seeing the Sheltering Tree again. Love it!
ReplyDeleteSuper cute idea, Bruni!
ReplyDelete